Create an application that will allow an operator to use a thermistor to measure and display temperature as a function of time. The application should:
- measure, then correctly convert the voltage across the thermistor to a properly scaled temperature reading in units selected by the operator,
- show an alarm state on an LED and on the front panel if the temperature is not in a user defined range defined by an upper and lower limit,
- plot the temperature and limits on a strip chart,
- save the measured temperature and high- and low-temperature limits to a tab-delimited text file, and
- continue to run until the operator hits a STOP button.
Project Folder
- Your main VI should be stored at the top level of your project folder and you should have separate folders to store any subVIs and Type Definitions. These folders should be added to your project as “auto-populating” folders.
Circuit Details

- Use the Vishay (10 kΩ @ 25°C, Digikey Part BC2301-ND) NTC Thermistor distributed in your kit to measure temperature.
- Arrange the thermistor in a voltage divider circuit with the provided 10-kΩ resistor.
- Use the +5V output of your myDAQ to provide excitation for the thermistor, but also measure the exact value using analog input channel
myDAQ1/ai1as shown. - Measure the voltage output of the divider with analog input channel
myDAQ1/ai0. - Calculate the resistance of the thermistor using the measured voltages and the knowledge that it is in a voltage divider circuit.
- Use the Steinhart-Hart thermistor equation to calculate the temperature from the resistance of the thermistor. (Refer to the Vishay Product Data Sheet for necessary parameters for your thermistor).
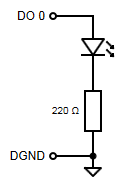
- Use the provided red LED, a 220 Ω resistor, and digital output channel
myDAQ1/port0/line0in a current-sourcing arrangement on your myDAQ to display the temperature out-out-range alarm status on an LED.
Top-Level VI Details
- Use a continuous loop design pattern for your top-level VI.
- This VI should use software timing to establish the rate at which temperature measurements are collected and provide a control where the user can adjust the measurement interval.
- On the front panel, provide controls listed below with data types and default values set to the values in square brackets:
- Acquisition Period (s) [DBL, 0.5s] – Used with software timing to control the time between successive measurements. Your application should respond to changes in this parameter while it is running.
- Temperature Units [Type Defined ENUM, Celsius] – Controls the display units for the temperature. Allowed values should be Celsius, Fahrenheit, and Kelvin.
- Low Temperature Limit [DBL, 26] – This value defines the low temperature of the acceptable temperature range. Assume that this value is in the same units as selcted by the Temperature Units control (i.e. no need to convert this value).
- High Temperature Limit [DBL, 30] – This value defines the high temperature of the acceptable temperature range. Assume that this value is in the same units as selcted by the Temperature Units control (i.e. no need to convert this value).
- Thermistor Output Voltage [DAQmx Physical Channel (Analog Input), myDAQ1/ai0] – This is the channel used to measure the output voltage from the thermistor/resistor divider network.
- Thermistor Excitation Voltage [DAQmx Physical Channel (Analog Input), myDAQ1/ai1] – This is the channel used to measure the excitation voltage applied to the thermistor/resistor network.
- Temperature Alarm Channel [DAQmx Physical Channel (Digital Output), myDAQ1/port0/line0] – This is the channel used to indicate an out of temperature range condition on an LED.
- Stop [BOOLEAN, FALSE, Latch When Released Mechanical Action] – A button the user can press to stop the data collection if desired before the Maximum Readings have been collected.
- Indicators available on the front panel should include:
- Temperature Out-of-Range [BOOLEAN] – An indicator that displays the Temperature Out of Range status. This indicator should be TRUE if the temperature is not in the range defined by the lower and upper limit.
- Temperature vs Time [Waveform Chart] – A graphical display of both the measured temperature and the temperature limits as a function of time. Display a legend to identify the three traces on the chart.
- The top-level VI should continue to acquire until the user presses a front panel Stop button.
- After the stop button is pressed, present the user with a file dialog to save the measured temperatures in a tab-delimited text formatted file.
Scale Thermistor Output subVI
- Encapsulate the code for converting the voltage measurements to a properly scaled temperature in a subVI using the Immediate subVI design pattern.
- This VI should use the Temperature Units control to select which set of temperature units to return the temperature value.
- Constants such as the thermistor parameters necessary to compute the temperature should be hard-coded on the block diagram. Measure your actual resistor value and use this value as a constant where needed in your code. In later examples, we will remove these details from the code to make the code more general purpose.
Documentation and Style
- Be sure to document your VIs by using
VI Properties>Documentation, by providing comments on the block diagram where necessary, and by adding descriptions to the front panel controls and indicators. - Be sure to create neat and easily readable block diagrams, avoid right to left dataflow, and avoid unnecessary bends in wires.
- For the top-level VI create a well organized front panel with controls and indicators arranged in a manner that makes the user interface easy for an operator to understand. For the subVI, create a simple (no frills) front panel with the controls arranged in the same pattern as on the icon connector.
- Be sure to create a unique icon for each VI including your top level VI.
- Use the VI Analyzer to check the VIs in your project for both documentation and style.


