Timing VIs in LabVIEW

This content is for registered users only. Please login.

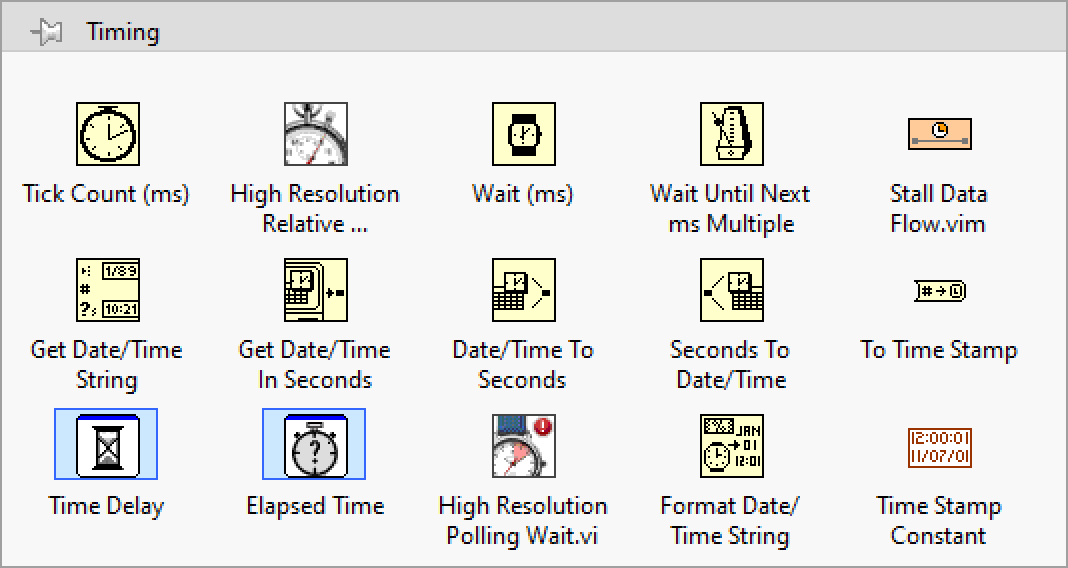
Controlling the time between loop iterations and being able to measure the time between events are both very important tasks in any data acquisition activity.  LabVIEW has a number of built-in timing functions that can help with these tasks.  These are available in the Programming»Timing palette as shown below.

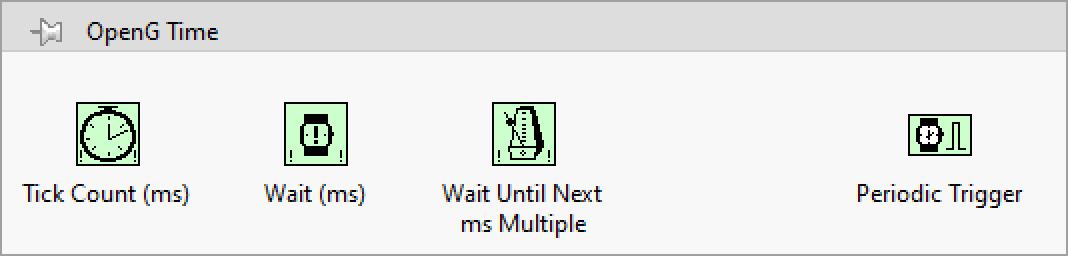
In addition, the OpenG Toolkit has a number of very useful timing VIs that add functionality to the built-in routines.

When using these timing VIs it is important to understand that some of them will cause your code to delay, while others will immediately report current or elapsed time information.  In the following discussion the most often used of these VIs are grouped into categories of those that introduce a delay, those that report the current time and those that report an amount of elapsed time.

VIs That Introduce a Delay

Wait (ms) Wait (ms)
Waits the specified number of milliseconds and returns the value of the millisecond timer. The actual wait time may be up to 1 ms shorter than the requested wait time.  This function makes asynchronous system calls, but the nodes on the block diagram execute synchronously. Therefore, this function does not complete execution until the specified time has elapsed.  Thus, a loop with that contains one on these VIs will not advance to the next iteration until this function finishes waiting for the specified time.
Wait (ms) - OpenG Wait (ms) - OpenG
This VI is equivalent to the built-in Wait (ms) function with added error handling.  It can be inserted into an error wire to introduce a delay at a specific point in the data flow of a VI.  It can be configured to not wait if there is an incoming error.
Wait Until Next ms Multiple Wait Until Next ms Multiple
Waits until the value of the millisecond timer becomes a multiple of the specified millisecond multiple. Use this function to synchronize activities. You can call this function in a loop to control the loop execution rate. However, it is possible that the first loop period might be short. This function makes asynchronous system calls, but the nodes themselves function synchronously. Therefore, it does not complete execution until the specified time has elapsed.
Wait Until Next ms Multiple - OpenG Wait Until Next ms Multiple - OpenG
This VI is equivalent to the built-in Wait Until Next ms Multiple function with added error handling.  It can be inserted into an error wire to introduce a delay at a specific point in the data flow of a VI.  It can be configured to not wait if there is an incoming error.

Stall Data Flow Stall Data Flow
Delays the data flow of the wire for a specified period of time. This malleable VI, introduced in LabVIEW 2020, can be inserted into any wire to introduce a delay at a specific point in the data flow of the VI.
Time Delay Time Delay
This express VI inserts a time delay into the calling VI.  It has error terminals so it can be inserted into a particular spot in the data flow of the VI.

VIs That Report the Current Time

Tick Count (ms) Tick Count (ms)
Returns the value of the millisecond timer.  The base reference time (millisecond zero) is undefined. That is, you cannot convert millisecond timer value to a real-world time or date. Be careful when you use this function in comparisons because the value of the millisecond timer wraps from \(2^{32}–1\) to \(0\).
Tick Count (ms) - OpenG Tick Count (ms) - OpenG
This VI is equivalent to the built-in Tick Count (ms) function with added error handling.  It can be inserted into an error wire to return the value of the millisecond timer at a specific point in the data flow of a VI. 
Get Date/Time in Seconds Get Date/Time in Seconds
Returns a timestamp of the current time. LabVIEW calculates this timestamp using the number of seconds elapsed since 12:00 a.m., Friday, January 1, 1904, Universal Time.  Use the To Double Precision Float function to convert the timestamp value to a lower precision, floating-point number.

VIs That Report the Elapsed Time

Elapsed Time Elapsed Time
This express VI indicates the amount of time that has elapsed since the specified start time.  The start time can either be the current time that the given instance of the subVI is called or it can be explicitly set to a given time (in seconds) value.  You can specify a target time to wait and poll this VI to determine when the elapsed time has expired.
Periodic Trigger - OpenG Periodic Trigger - OpenG
This OpenG VI will periodically output a Boolean TRUE on a specified time interval. The internal timer’s counter can be reset to zero, via the “reset” Boolean input.

Examples

Benchmarking Code

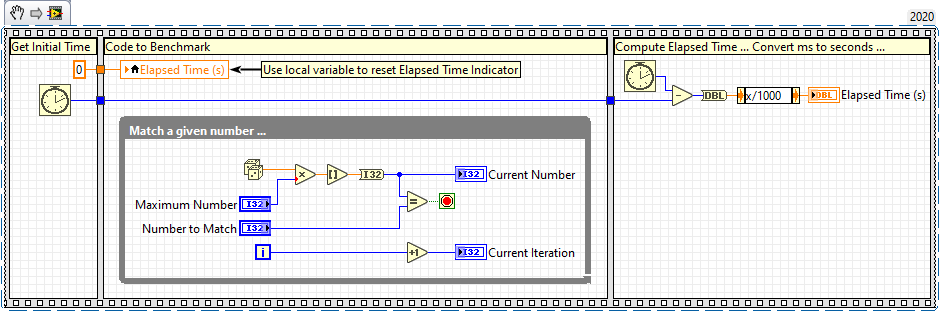
A common use of the Tick Count (ms) function is for benchmarking the execution speed of a block of code. In the figure below the initial time is measured in the first frame of the sequence structure, the code of interest is put in the second frame, and the final time is measured in the last frame.  The execution time is computed by taking the difference in these two values of the millisecond timer and then dividing by 1000 to convert to seconds.

Comparing Wait (ms) and Wait Until Next ms Multiple

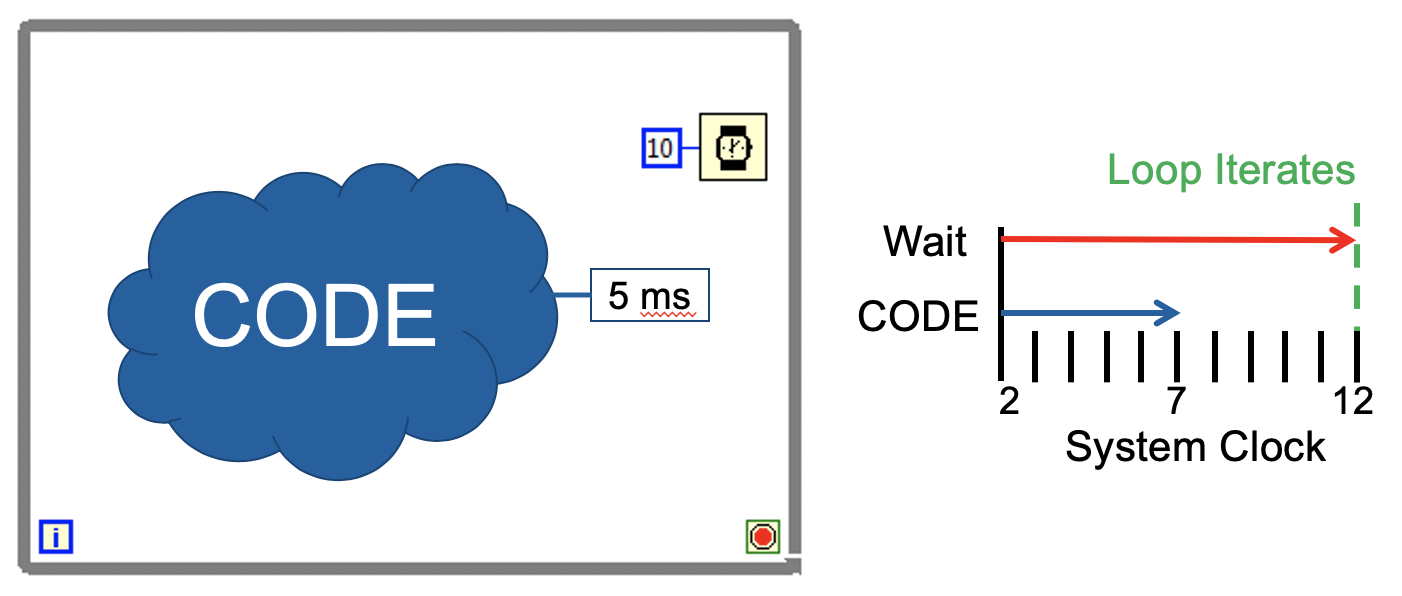
The diagram below shows how the Wait (ms) operates to control the elapsed time of each loop iteration.  In this figure notice that there is a segment of code that takes on the order of 5 ms to execute.  There is also a Wait (ms) function that is set to introduce a delay of 10 ms.  Notice that there is no data dependency between this block of code and the Wait (ms) function which means that the Wait (ms) node will begin executing at the same time as the rest of the code in the loop.  Since the code in the loop takes less time to complete than the input to the Wait (ms) function, the Wait function will cause the loop to delay 5 additional milliseconds for a total delay of 10 ms.

The Wait Until Next ms Multiple operates in a similar fashion but there are important differences.  This wait function will ensure that the loop completes when the ms time is a multiple of its input value.  In the example below, the CODE will execute in 5 ms, and the loop will not iterate until a multiple of 20 ms is reached on the system clock. As you can see from this example, the loop period may be less than 20ms in the first iteration, but subsequent iterations will be the desired time.  

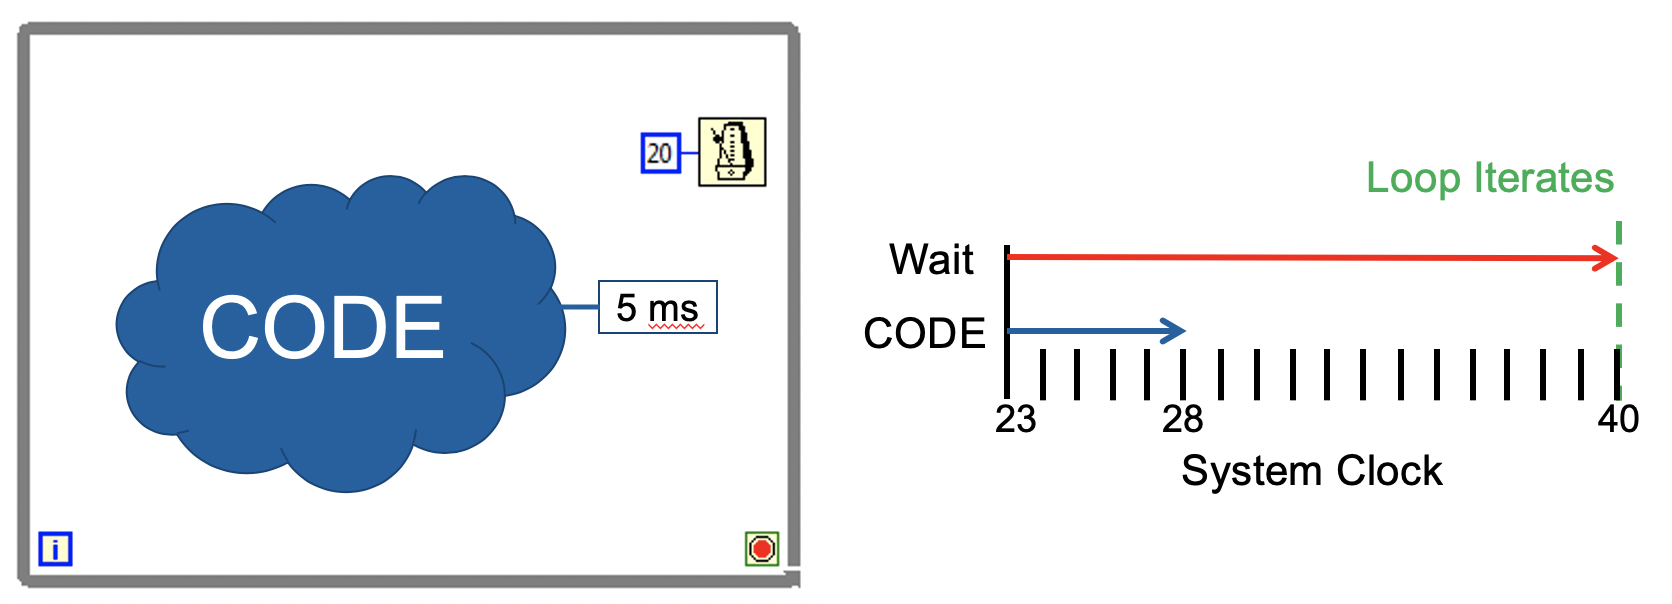
The Wait Until Next ms Multiple VI can be useful when you have multiple loops running an you wish to synchronize them so that they all end at the same times.  

The following examples compare using Wait (ms) and Wait Until Next ms Multiple.  Drag these VI snippets to empty block diagrams and test them separately to make sure you understand their operation.
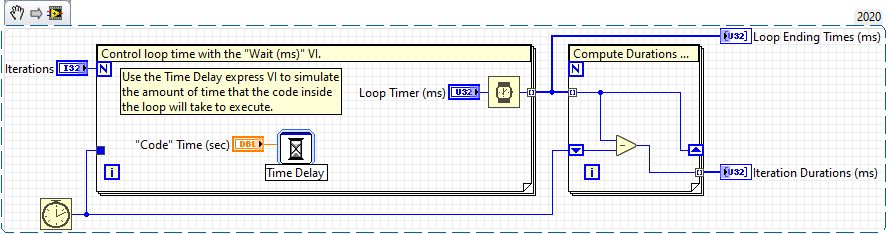
Using Wait (ms)


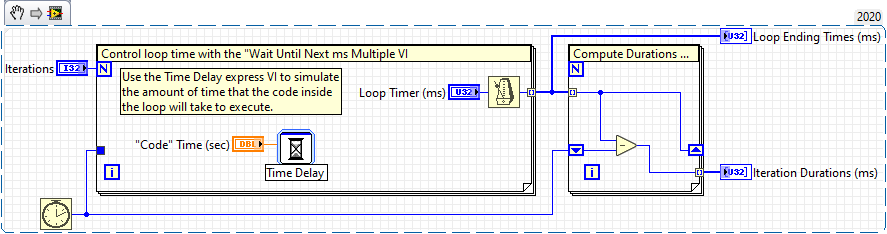
Using Wait Until Next ms Multiple

In these examples additional code has been added to compute the amount of time that each iteration of the loop took to complete.  Notice that with the Wait Until Next ms Multiple VI that the first loop iteration is likely less than the desired time but that each iteration of the loop ends with the millisecond timer at a multiple of the desired wait time.  Also notice that there is a small amount of jitter, usually no more than 1 ms, in the loop execution times.

Finally, it is important to note that if the “code” in the loop takes longer to execute than the desired wait time then neither of these delay routines will give the proper loop iteration period as depicted in this graphic below.  You can easily verify this if you use either of the VI snippets from above.

Print Friendly, PDF & Email
Top